I think I’ve been making chocolate chip cookies since I was in grade two! Growing up in a family with four kids, we were occasionally treated to store-bought cookies. My passion for baking grew when I was about eight years old and my mom allowed me to use the oven, encouraging me to bake from scratch. The recipe on the back of the Baker’s Chocolate Chip package is the one I continue to follow, however, I have made some changes over the years: upping the brown sugar from 1/4 to 1/2 cup, and allowing the dough to rest overnight before baking. My latest edition is using buckwheat flour to make them gluten free.
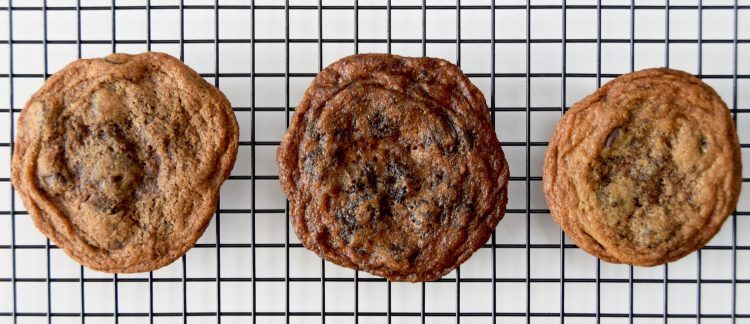
This brings me to the photo that is attached to this post. Three cookies, from left to right: Buckwheat flour; All purpose flour; All purpose flour + 1/4 cup flour
All cookies were baked for 10 minutes in a 180C oven. The cookie in the middle shows a cookie that is rather ‘caramelized’! – I believe this is because it didn’t have enough flour in the mix. It was from the batch made with 1 cup of Dutch all purpose flour. I have been using spelt flour and buckwheat flour for the past couple of years and totally forgot that when using Dutch flour, I need to add 1/4 cup to every 1 cup required in a recipe. I learned this trick from my friend, Dorothy, who was the Home Economics teacher at the school where I teach. It works a treat and helps to balance the dry with the wet ingredients. So, the final cookie on the right, is the original recipe with an additional 1/4 cup of flour added. As you can see, it didn’t spread as much and baked more evenly.
In terms of texture, the cookie made with all purpose flour is a tad chewier than the one made with buckwheat flour. The taste, in my opinion, is almost equal. Both have a slight crunch on the outside and a lovely soft centre. The buckwheat version is only slightly crumbly; it doesn’t fall apart in your hands, but it breaks apart a little easier. I like them both, but will go with the buckwheat version to keep my gluten intake in check. As well, the health benefits from buckwheat: high fibre, lowers cholesterol, source of protein, are an added bonus.
So, whatever your pleasure, I invite you to make a batch of chocolate chip cookies. Add a half of a cup of chopped nuts when you are mixing, or a sprinkle of sea salt when they are fresh out of the oven for a variation in taste. You can double the recipe and keep half in the freezer, roll it into a log and slice off 1cm sections, pop them onto a cookie sheet and bake away!
You will need:
- 1/2 cup (125 grams) unsalted butter at room temperature
- 1/2 cup (100 grams) white sugar
- 1/2 cup (110 grams) dark brown sugar, packed
- 1 egg
- 1 tsp pure vanilla extract
- 1 cup (125 grams) all purpose flour (In Europe, I use 160 grams of flour = 1/14 cups) Or, use 1 cup of buckwheat flour for a gluten free option
- 1/2 tsp baking soda
- 1/2 tsp salt
- 250 grams chocolate chips (approximately 1-3/4 cups)
Directions
- pre-heat your oven to 180C
- Combine the butter and sugars, vanilla and egg and beat until light and fluffy.
- Mix in the flour, baking soda and salt by hand until well blended.
- Stir in the chocolate chips.
- Scoop the dough into a glass container you can cover, or wrap the dough in clingfilm, and refrigerate overnight to allow the dough to rest. (I rested my dough for 48 hours for these batches.)This step is not absolutely necessary but I have found it produces a richer, layered flavour and I notice the caramel notes from the brown sugar.
- When your dough is ready, scoop by the tablespoon and drop onto a cookie sheet lined with baking parchment.
- Bake at 180C for 10-12 minutes. I start checking the cookies at 8 minutes and keep an eye on them from there. It’s important to remember that cookies will continue to bake when you remove them from the oven and allow them to set on the baking sheet. For this reason, when you see them start to brown around the edges, take them out and allow them to start to cool on the baking sheet. When they’ve firmed up a bit, slide them over to a wire rack to cool completely.